Tuesday, October 30, 2012

Chocolate Cake Taste Test

I have been planning a taste test of chocolate cakes for a while. I was feeling a little stir crazy last week, so I started baking, and baking, and baking.

I tried to have a diverse selection of chocolate cakes. All used cocoa, though the ATK recipe used unsweetened chocolate as well. I had a wide variety of mixing methods as well. I did not try to isolate variables; I just used recommended recipes as they are.

I made 6 cakes in 9 by 13-inch pans. I frosted each with American Buttercream, without the almond extract. Each frosting was tinted a different color so I could keep track of the different cakes. Eight of my friends and family had a small piece of each cake, served with seltzer as a palate cleanser. Most rated each cake 1-5 and some gave comments as well.

The test ended up being double-blind, as I had forgotten which cakes were which. I'll start with the winners.

I was initially prejudiced against the Chocolate Butter Cake from Cookie Madness; I thought all-butter cakes were inevitably dry. I included it in the test only because I was seduced by the picture and description. The butter cake ended up being one of the two winners. The flavor was amazing. The texture was more fine-grained and velvety than stick-to-your-fork moist. The mixing method is the paste method, where the butter and flour are combined first.

The other winner was the Chocolate Sour Cream Cake. It had awesome flavor, of course, but a slightly coarser and perhaps more moist crumb. I want to point out that no two people agreed on what was moist and what was dry, so it's very subjective. It is made by whipping the eggs and sugar until light, then stirring in the sour cream and vegetable oil.

Of these two winners, everyone loved one or the other—I loved both. Even those who had a different favorite rated one of these two very highly.

None of the other cakes was bad, and all had their strong points. As my Dad said, "I would eat any one of these."

The KAF Chocolate Cake was the most well behaved. If I were learning to bake, I would use this guaranteed recipe with its very clear directions. It also was the most attractive and came out of the pan best. It has a milk chocolate rather than dark chocolate flavor.

The Deep Dark Chocolate Cake from Hershey's was the easiest to make and had a good, dark flavor. One of the tasters thought it was slightly bitter even. It is simply stirred in one bowl.

The BakeWise version of the Deep Dark Chocolate Cake was definitely the most dense. I thought it was almost a brownie. It was a little trickier to make though.

The Old Fashioned Chocolate Layer Cake from ATK had cocoa and unsweetened chocolate. Its taste was distinctive, probably because of the chocolate. It whipped the eggs and sugar first, like the sour cream cake.

I will make the butter and sour cream cakes a couple more times, to figure out which I prefer and to make any changes.

Note: my update and final conclusions are here.


Monday, October 22, 2012

Cake Serving Sizes for the Amateur

How many people does a 9" cake serve? It seems like a simple question, but it can get very complex.

There seem to be two commonly used charts: Wilton's and Earlene's. Wilton says that a two layer 9" cake serves 32. Earlene's Cakes says a 9" cake serves 22. Straightforward, if contradictory.

However, both of these amounts are using the industry standard serving size of 1" × 2". That is a piece of cake the size of the business end of a fork.

Picture from Wikipedia
Everyone agrees that this is very small, but everyone also agrees that this is the standard. A standard is important because many cakes are priced by the serving.

For those of use who want to eat cake, there is something called the Party Serving. We're getting a little better here.

But how do I cut my son's birthday cake? And what if I would rather cut wedges than concentric circles? What about home bakers and amateur party party planners, for whom the industry standard isn't relevant, but appetites are?

Well, I did some research, did a lot of math, and cut some cakes. I drew from Lark Cake Serving Guide, which I found to be the most clear.

According to Lark Bakery, 10" is the largest round cake that can be cut into wedges. That's the largest size on my cake serving chart.

I used two differently sized slices: generous and sensible. My sensible portion is about the size of a cupcake, and my generous portion is, well, generous. As Wilton does, I assumed that the cake is two layers deep. The cake above is cut into generous portions. Specifically, a generous portion is approximately 6.5 square inches, with a piece 2 by 3½-inches. A sensible portion is 3.5 square inches, with a piece 1¾ by 2-inches.

Round Cake Cutting Diagram
Round Cake Servings

Diameter, inchesGenerous Sensible
648
7610
8814
91018
101222
 

For smaller square and rectangular cakes, it is convenient to think of how to divide a cake along its edge—in thirds, fourths, or sixths. I have listed how to cut the slices on each edge for all sizes but 13 by 18-inch, which is in my experience too large to cut that way.

Square and Rectangular Cake Servings

SizeGenerousDivisions
by length
Divisions
by width
SensibleDivisions
by length
Divisions
by width
8-inch Square9331644
9-inch Square12432464
9 by 13-inch18633284
13 by 18-inch3664
 

11/12/2012—updated to clarify picture source

Saturday, October 13, 2012

Corn Cookies

I take back anything the slightest bit catty I might have said about Momofuku Milk Bar. Christina Tosi is a genius, and her corn cookies are amazing.

My kids asked for cookies and I was out of chocolate chips (gasp!). The corn cookies from Milk Bar have interested me for a while; I made them but warned my husband that he might not like them (he's conservative about flavors).

The recipe is posted in full at The Kitchn. I try not to post recipes that aren't my own, so I'll just refer you to the article for specifics.

The first step, as for a lot of baking, is to set the butter on the counter to soften. In this recipe, you use 2 sticks of unsalted butter.

I weighed 65 grams freeze dried corn into my food processor,

then processed it until fine. My freeze-dried corn is from Thrive, a great product, but mail-order only. A similar product from Just Tomatoes, conventional and organic, is available in many natural food stores.

A scale that can measure in grams is VERY helpful for these recipes, thought Christina Tosi does give volume equivalents.

I mixed 300 grams sugar and the two sticks butter on medium-high for 3 minutes. Christian Tosi takes creaming very seriously, so I followed her times.

I then added 1 egg and mixed on medium-high a full 8 minutes.

While the mixer was running I measured and whisked together the dry ingredients: 225 grams flour, 45 grams corn flour, ¾ teaspoon baking powder, ¼ teaspoon baking soda, and 1½ teaspoons kosher salt.

I used Maseca instant masa or corn flour. I included the affiliate link only for the picture—it's available very cheaply at almost any North American supermarket. As an aside, I use Maseca to make very easy corn tortillas for tacos; the ATK blog has a great tutorial.

After the 8 minutes of creaming, I mixed in the dry ingredients for just a minute on the lowest speed. Isn't that the most beautiful cookie dough?

The original recipe makes 13 cookies with ⅓ cup dough each. Considering that ¼ dough makes huge cookie-shop-at-the-mall-sized cookies, ⅓ seems large for home baking. I used my fabulous #40 (tablespoon) cookie scoop from King Arthur Flour, and got approximately 3 dozen nicely-sized cookies. I refrigerated them, covered, for 1 hour.

After the dough was cooled, I preheated the oven to 350. I arranged 12 cookies on a lined sheet and smooshed them with a glass measuring cup.

As I changed the cookie size, I watched them carefully in the oven. At 12 minutes the edges were just starting to brown. I was able to transfer them to a cooling rack immediately, losing only one to carelessness and fragility.

Everyone loved these cookies. My husband said "I thought you were going to make cookies I wouldn't like," and stated that they tasted like regular sugar cookies to him. Also, he said that they look healthy but don't taste healthy. The extended creaming really contributes to the texture.

My only caveat is that the cookies are a little salty; I probably will cut back on the salt by one third the next time I make these—and I will make them again.


Thursday, October 11, 2012

Apple Crumble

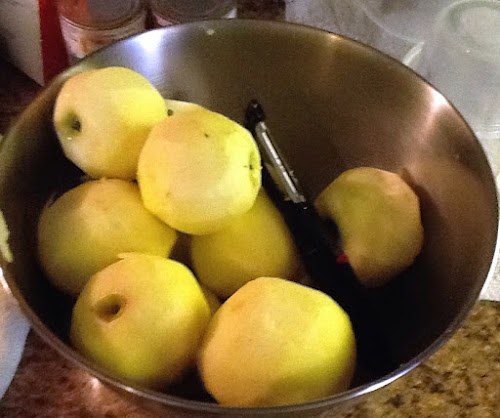
Frederick, Maryland has several orchards and we get great apples. I asked for a recommendation for baking at the Farmers Market and bought a half bushel of 2nd Jonagolds. I'm not up on my old measurements, but a half bushel is a LOT of apples. I just can't resist 2nd produce, which is produce too ripe or unattractive to sell at full price. You usually can't pick your amounts though.

I made one of my favorite desserts, apple crumble. The crumble I like is very specific and not very common. I had it in England when I was a kid, and I'm pretty sure it came from a box. It's very sweet and has no oats or nuts. I like both, but not in my crumble, which is about sweetened baked apples and nothing else.

It is also the least specific and detail-oriented recipe I make, which is great for people who otherwise might be timid at the thought of baking.

I got the recipe in the late 1990s from SOAR, the Searchable Online Archive of Recipes, one of the best recipe collections on the early-ish Internet.

My sweetie peeled the apples for me, the hardest part of the whole thing. You can leave them on of course.

The he put them through my fab apple slicer from Willliams Sonoma. It was a recommendation from Cook's Illustrated, and works very well. I'll buy a $20 gadget if it helps me and the kids eat more fruit. These were really good apples—both of my kids and I ate slices before they went in the oven.

I measured 1 cup all-purpose flour, ½ cup white sugar, 1 cup brown sugar, 1 stick salted butter, and ½ teaspoon cinnamon into my food processor.

I then processed it until the butter was in small pieces.

I put all the apples in a 9 by 13-inch Pyrex baking dish, then dumped the crumble on top. I would have mixed it in a little if the dish wasn't so full.

Finally, I baked the apples for 1 hour at 350. We ate the apples as soon as they wouldn't scald us outright.

Personally, I eat apple crumble in a bowl with cold milk like cereal. Cream or vanilla ice cream would be great too.

The imprecision comes from the amount of apples. I use any amount of apples I have, in whatever dish they fit in. I make the same amount of crumble each time, but only use as much as seems appropriate. The mixture freezes very well in a zipper plastic bag. I bake until the apples are soft, and raise the temperature if I don't have a lot of time. It's just apples and sugar, so it's hard to screw it up.

I can't wait until the next time I go to the Farmers Market!

Apple Crumble

Serves 8, scales well

½ bushel apples (a lot), cored, peeled if you wish, and in slices or chunks

1/2 cup sugar

1/2 teaspoon cinnamon

1 cup flour

1 cup brown sugar

8 tablespoons butter

Directions:

Preheat oven to 350 degrees.

Combine ingredients until mixture has a crumb-like texture. You can use a mixer, food processor, dough blender, or your hands.

Put apples into a baking dish. Top with crumb mixture.

Bake uncovered approximately 1 hour until tender. Cool slightly before eating.


Saturday, October 6, 2012

Frozen Buttercream Transfer (Crab Cake)


Frozen buttercream transfers allow you to put an image on a cake. It allows you to use images from online or books, which is important because many people are not comfortable drawing freehand. Also, the transfer technique allows you to work slowly and correct your mistakes as you go. This works very well for cartoon characters for children's cakes.

There are two YouTube videos I found helpful. Wilton's video does a cartoon character with outlining. Seriouscakes does a more advanced transfer from a photo—wow!

This is sheet cake for my church's annual crab feast. In Maryland we take our crabs seriously, and crab feasts are very important.

It was a large event so I made a half sheet cake from two 9" × 13" cakes. I used my Damp Yellow Cake and American Buttercream recipes. You need to use homemade frosting as the fat needs to be at least 50% butter so it will freeze hard enough.

I started by looking up drawings of crabs online. I eventually settled on a this How to Draw a Crab page. My said that a more realistic crab is too gross to put on a cake. He's not from Maryland.

I did my pencil sketch on a sheet of 9" × 11" paper.

I then went over it with Sharpie.

I taped the image to a cutting board, and taped wax paper over it. Everyone seems to use wax paper and not parchment, but I'm not sure why. You can use anything flat that you can move to your freezer in place of the tutting board.

I colored my icing with a mixture of red, yellow, and brown Wilton icing colors, then piped an outline using a #2 round tip.

I filled in the outline with a combination of blobs and zig zags.

I let the frosting crust and smooshed it down with Via paper towels and my hands.

I inelegantly went over the whole design with white icing

and smoothed it with an icing spatula.

I froze the design for 45 minutes. You are supposed to freeze it for at least 90 minutes, but I was running late. Finally I turned the design onto the cake and removed the paper.

Good luck with your cakes!